What’s it all about?
- Having a CDN in front of the web application helps to reducing number of back-end servers
- End-users benefit from faster page loading times
- Introducing the CDN is not that trivial and requires some preparation
As a follow up to Patryk’s “Django: Fast” series here on our blog, I’d like to share a couple of words about further implementations that can make your site faster.
Let’s say that you have a popular site which is visited by a large amount of users every minute. You’ve may have already fixed all the code-related problems and patched the bottlenecks that were highlighted in the previous articles, but you still need quite a lot of servers to handle traffic peaks without downtime.
The root cause
First of all we should think about the root cause of problems. During a high traffic peak, every client that enters your site (for example, with a link that leads to a list of products) forces the backend to fetch the product data from the database, render the appropriate template, and return the content to the client’s browser. This process is repeated for each click of every user visiting the same page.
We could save a lot of time if we could do this only once and reuse the result for multiple customers… which is where CDN comes to the fore.me text...
What is CDN?
No silver bullet
Two of the most complex problems in computer science are naming things and cache invalidation. You can’t enable caching for all your content without tweaking your app’s code, otherwise you’ll end up serving the same content to each user, such as the same cart or checkout form. Let’s take a closer look at the cache invalidation problem.
Controlling the CDN Behavior
Cache-Control Header
ETag Header
This header contains a ‘version’ of content generated by the application. It’s extremely important to update this value when the content changes, otherwise the CDN will serve outdated content to the end user. The value could be any string you choose, such as the md5 hash of the content or the last update date.
So, we have Cache-Control and ETag, but how does it work under the hood?
Example:
Let’s consider the following setup:
User — a browser
CDN — a CDN endpoint (AWS Cloudfront, Akamai, Cloudflare, etc.)
Backend — a web application backend
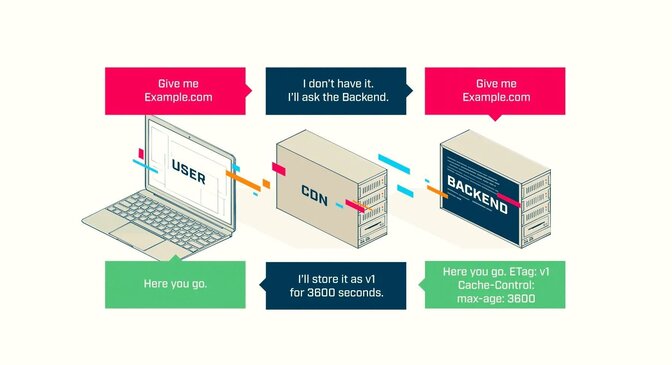
The core idea is to point your main domain (example.com in this case) to the CDN endpoint instead of to your own web server. It will offload all content from your own servers to the CDN network managed by the third party.

In this case, the user requested a page that was not present in the CDN cache, so it was generated by the backend and stored in the CDN cache. It will be there for a maximum of 3600 seconds.
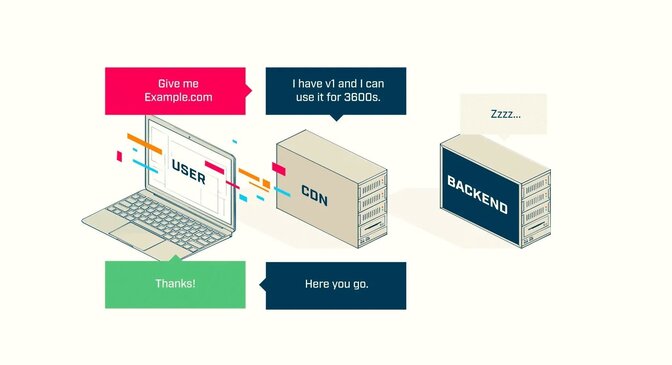
Every subsequent user asking for example.com will receive the cached content without hitting the backend.
This version of the content will be valid for the next 3600 seconds.

After the time elapses, the CDN will query the page from the backend again.
With every change to the content, the backend should update the ETag value to make the CDN aware of the newer version.
Setting up a CDN service in front of your site can improve your user’s experience while visiting the site. Nevertheless, you should remember that introducing a CDN or another high-level caching system can bring a new class of problems, so never start optimizing the performance with cache and CDN. When you’ve polished your codebase and optimized it as much as you can, you can add the CDN as the cherry on the cake and further improve site loading times.
We’ve walked through the CDN setup basics, which is a great start for now. In the next post, I’ll cover the cache controlling implementation in Django-based applications.